Wednesday, January 29, 2014

Another Pot Pie? Ooooh, Fudge!

Hamburger Pot Pie

Personal
Yield:  1 8x8 pot pie
Time:  1 hour

1 disk pie dough
1 lb ground beef
Salt & pepper to taste
1 tbsp garlic powder
1 tsp paprika

Gravy
2 regular potatoes, cut into small cubes
1/2 cup chicken stock
1/2 cup half & half
1 1/2 cups milk
1 pkg McCormick Brown Gravy mix
1 8 oz can tomato sauce
2 celery stalks, halved lengthwise & sliced
2 carrots, peeled, halved lengthwise, & sliced
Salt & pepper to taste


Preheat oven to 375°.  Grease & flour 8 inch cake tin.  Heat pan over medium heat; add beef & season with salt, pepper, garlic powder, & paprika.  While beef is cooking, roll out half of dough for crust; transfer dough to cake tin & trim with knife or pizza cutter.  Pierce bottom of crust several times with fork.  Line crust with aluminum foil and fill with beans.  Blind bake crust for 7 minutes.  While crust is in oven, transfer cooked ground beef to a bowl with a slotted spoon.  Add potato & cook until bottoms are brown; add chicken stock, half & half, & milk.  Let warm 1 minute & add gravy mix.  Let come to a boil; stir in tomato sauce until well incorporated.  Return to boil; add celery & carrots.  Season with salt & pepper to taste.  Roll out remainder of dough for tops crust.  Test veggies in gravy; they should be just fork tender.  When gravy is ready, pour over ground beef.  Cover with top pie crust.  Trim edges; cut slits into top of pie.  Place pie on cookie sheet & return to oven for 25 minutes.

 Flickr:  Hamburger Pot Pie


Super Easy Peanut Butter Fudge

Facebook:  Just A Pinch
Yield: 8x8 pan
Time:  10 minutes

2 cups sugar
1/2 cup milk
1 tsp vanilla extract
3/4 cup peanut butter

Butter 8x8 dish.  Prepare all your ingredients by measuring them and laying them out for immediate use.

Over medium heat, bring milk & sugar to a hard boil; stirring constantly, boil for 2 1/2 minutes.  Remove from heat.  Stir in vanilla.  Stir in peanut butter until smooth.  Pour into dish & cool.

Flickr:  Peanut Butter Fudge


More Info

Hamburger Pot Pie

This recipe is pretty straight forward.  I will say that I recommend using a pizza cutter to cut/trim your dough with, especially if you roll it out as thin as I do (which I'd say is maybe 1/8 inch thick?  Not real sure how accurate that is).

Super Easy Peanut Butter Fudge

Okay, my original blog post for this was deleted by accident.  Which is a good thing, because now I can bring you this important update about this recipe.  If you watch my video for this recipe (YouTube:  Top Of The Fridge To Ya), you'll see I use a whisk, and that my fudge starts cooling on me very quickly and that it becomes difficult to pour.  Do Not Use A Whisk!  This causes air to be incorporated into the fudge, thus cooling it more quickly.  It also changes the overall texture of the finished product!  I made a second (double) batch just last night (because it keeps going really fast around here), and I used a wooden spoon (and then the spatula to spread it out with, since I had to use the spatula to get the peanut butter out of the bowl it was in anyway) to stir the fudge with.  It came out a more smooth consistency and was more easily poured into the prepared dish.

Overall Meal

So, I don't have pretty shots of the plated food for you to enjoy (because I didn't think to take those pictures this time), and while I would like to post my videos here for these recipes, blogger, for some reason, refuses to recognize my videos from YouTube.  Anyway, if you ask me, you don't really need a side for pot pie; it's a pretty complete meal in and of itself.  And the fudge makes a good dessert/anytime treat.  If you'd like to see my demonstrations of these recipes, check out my channel on YouTube, titled Top Of The Fridge To Ya.

UPDATED 02/13/14:

  • Added links under recipe titles to credited source

Questions?  Leave a comment!

Monday, January 27, 2014

Potato Chip What? Oooh, A Poke Cake!

Potato Chip Crusted Pork Chops

Personal
Yield:  4-5 chops
Time:  35 minutes

Wash Mixture
2 tbsp apple cider vinegar
1 tsp yellow mustard
1/2 tsp honey
1/2 tsp garlic powder
Pinch paprika
Salt & pepper to taste

4-5 pork chops
2 cups crushed sour cream & onion potato chips
Vegetable oil, to coat pan
1 tbsp butter

Preheat oven to 425°.  Combine ingredients for wash mixture.  Dip pork chops, both sides, into wash mixture, then coat with chips.  Over medium heat, heat oil & melt butter.  Brown pork chops in pan, about 3 minutes each side.

Transfer pork chops to a cooling rack placed on a cookie sheet.

Bake 20 minutes to cook through.
Flickr:  Potato Chip Crusted Pork Chops


Banana Pudding Poke Cake

Pinterest:  Very Yummy Dessert
Yield:  13x9 cake
Time:  45 minutes

Cake
1 box white cake mix
2 tbsp butter, melted
1 tsp vanilla

1 5.1 box instant banana cream pudding mix
3 cups cold milk (for pudding mix)
1 8 oz container whipped topping
1 box wafer cookies, crushed

Preheat oven according to cake mix directions.  Assemble cake mix according to directions, adding in butter & vanilla while it's mixing.  Bake cake.
When cake comes out, use end of wooden spoon & poke holes in cake.  Mix pudding & milk & spread over cake.  Spread whipped topping over cake & sprinkle over wafer cookie crumbs.
Flickr:  Banana Pudding Poke Cake


More Info

Potato Chip Crusted Pork Chops

Okay, I know the wash mixture sounds strange, and I'll admit, I mixed it together completely on whim.  But when I tasted it (before I put the pork chops in it, of course), it tasted amazing.  I was genuinely surprised by the taste.  And the flavor carried through to the end of the cooking process.  It made for some absolutely delicious pork!
Now, I say 2 cups of crushed chips, but honestly, I used a third of a bag that had been sitting on top of our fridge for over a month (they weren't stale, just...old).  Nobody was eating them because the brand we got was a bit bland in flavor.
Feel free, of course, to use whatever flavor of chips you want.  Cooking is all about happy experiments!

Banana Pudding Poke Cake

I would've highly preferred a butter recipe cake mix, but what we had in the cupboard was a white cake mix.  Thus the addition of the butter and vanilla.  Also, the original recipe called for a yellow cake mix (not butter recipe, but still...).  As for what my cake mix called for, it was 3 egg whites, 1/3 cup vegetable oil, and 1 1/4 cups water.  I baked it for 30 minutes, and it was done (I don't remember what temperature, but I think it may have been 375°?).
Also, my mother and I went ahead and had a piece not five minutes after the cake was done, but it's probably best to chill it for an hour or two first.  I don't know.  It was pretty good, to me.

Overall Meal


So what to serve with the pork chops?  Well, all I served with it was green beans, but I would recommend maybe a side of mac and cheese, and maybe some peas?  Yeah, that sounds good to me.  And of course, have the cake as a dessert!  Enjoy!

UPDATED 02/13/14:

  • Added links under recipe titles to credited source

Questions?  Leave a comment!

Friday, January 24, 2014

Mmm, Pot Pie!

All Butter, Really Flakey Pie Dough

Pinterest:  Tara Liptak (Smells Like Home)
Yield:  2 9-inch pie crusts
Time:  15 minutes, 2 hours

2 1/2 cups flour
1 tbsp sugar
1 tsp salt
2 sticks cold butter, grated
1/2-3/4 cups icy cold water

Mix flour, sugar, & salt.  Crumble in butter.

Mix in water, adding more as needed, until dough comes together.
Flickr:  Pie Dough

Separate in half & form into disks.  Wrap in plastic wrap & refrigerate at least 2 hours.

Pork Pies

Inspired By This Pin's Photo
Yield:  12 pies
Time:  about 1 hour

5 pork chops, cut into 1/2-1 inch cubes
Salt & pepper to taste
2 tsp garlic powder
1 1/2 tsp rosemary
1 1/2 tbsp butter
Pie dough, plus flour for rolling

Gravy
1 potato, cut into small cubes
1/2 cup chicken stock
1 cup milk
1 pkg McCormick Brown Gravy
1 8 oz can tomato sauce
1 stalk celery, halved lengthwise & sliced thinly
1 carrot, sliced thinly (halved lengthwise if necessary)
Salt & pepper to taste

Preheat oven to 375°.  Season pork.

Melt butter in pan over medium heat & add pork.  While pork is cooking, roll out dough disk to roughly 1/8 inch thickness.


Cut into squares, roughly 3 inches.  Grease/butter jumbo muffin tin(s).  Press dough squares into the muffin tin(s), and pierce the bottoms a few times with a fork.


Bake 5 minutes.

Remove cooked pork from pan & add potato, cooking for roughly five minutes.  Add chicken stock, milk, & brown gravy mix.  Let come to a boil.  Stir in tomato sauce until well incorporated.  Let return to boil.  Add in carrot & celery and cook, stirring often until carrot & celery are just starting to become tender.

Put a single layer of pork into pie crust.

Top with a tablespoon or two of gravy.

Top with dough squares.

Pierce each pie once with a fork and bake for 20 minutes.
Flickr:  Pork Pot Pies


More Info

All Butter, Really Flakey Pie Dough

Okay, if I had my way, this would just be titled "Pie Dough."  As it stands, however, I left the title as is so it'd be easier to find on Pinterest's website.  Now, as for what differs from the original recipe...I grated the butter.  The original recipe says to cube it up, but I wanted to grate it to make it easier to incorporate it into the flour mixture.  After grating it, though, I stuck it in the freezer for about five to ten minutes while I gathered everything else together.
It's best to use your hands to mix this dough, by the way.  Just get in there and attack it!
The recipe also said this dough could be refrigerated for a week, or frozen for up to 2 months, but that it had to be refrigerated at least 2 hours before use.
Also, as a last note, handle this dough as little as possible.  The colder it is, the better.  It will help make it flakier and fluffier.  Why?  Because when the butter is hit by the heat of the oven, it will basically evaporate and make the dough puff up.

Pork Pies

Okay, this recipe is credited to Pinterest, but really...it's pretty much my own.  I was inspired by a photo on Pinterest.  Even when you go to the website for the recipe, it's only a picture, with no way to get to a recipe at all.  So this recipe basically came out of my head.
And yes, yes, I know...I cheated again, using the Brown Gravy mix.  MEH.  It worked perfectly for the gravy, and it helped thicken the gravy as well.

Overall Meal


So I served my family two of these pies each (there was enough dough and pork/gravy for a dozen, but I only made 8).  Quite frankly, it wasn't enough.  My brother can be quoted as saying "I could probably eat four or five" after I asked him how many he thought he could've eaten.  So next time I make these, I will probably be doubling my recipe (for the dough at least...I think I can stretch the pork and gravy enough to make 24...not sure yet).  However, it probably would've helped if I'd made sides...which I didn't.  Honestly, I had like four potatoes left, otherwise I would've made mashed potatoes and corn to go with it.  Yes, I know, that's a LOT of starch, but it would be filling and taste good together.  However, if that's not for you, go with broccoli for a side instead of corn.  And if you don't want mashed potatoes, double up on the broccoli and add a cheese sauce!  Easy peasy~.

UPDATED 02/13/14:

  • Added links under recipe titles for credited source


Questions?  Leave a comment!

Monday, January 20, 2014

It'sa Me! Spa'ghetti!

Incredible Baked Meatballs


Yield: 24~ meatballs
Time: 45 minutes

1 lb ground beef
2 eggs, beaten with 1/2 cup milk
1/2 grated Parmesan
1 cup breadcrumbs
1 small onion, grated
2 cloves garlic, grated
1/2 tsp oregano
Salt & pepper to taste
2 tbsp basil


Preheat oven to 350°.  Grease cookie sheet.  Combine all ingredients and form into meatballs.  Bake 30 minutes.


More Info

Incredible Baked Meatballs

Okay, the original recipe had a good few differences.  Firstly, it said to mince, not grate, the onion and the garlic.  I just felt like grating them for the heck of it.  Be warned, however, that even if your eyes don't normally water when you cut an onion, they definitely will when you grate one.  And do so carefully, as well.  If you are grating the onion at a mad pace, the onion juices will squirt into your eyes.  It did it to me, even though I wear glasses (still trying to figure out how it managed that one).
Secondly, the original recipe called for 1/4 cup fresh minced basil.  I just went with 2 tbsp of dried basil, since dried herbs are stronger than fresh herbs, and 2 tbsp is (or is about) half of 1/4 cup.
Thirdly, the original recipe didn't tell you to grease your cooking surface.  I learned this the hard way, with my meatballs sticking to my baking surfaces.
Lastly, the original recipe said you could use panko or bread crumbs.  Panko is costly, and I already had bread crumbs, so that's what I went with.
Also, the reason there are so many meatballs in my pictures is because I made a double batch.  I wasn't sure how many it was going to make, plus my brother's girlfriend was over, so I wanted to be sure we had enough.
I did make the mixture ahead of time and refrigerated it, but I wouldn't recommend refrigerating the mixture more than 24 hours (I only refrigerated mine about 4 hours).
Also, you'll notice from the pictures that I used a glass casserole dish and a cake pan instead of a cookie sheet to bake my meatballs.  It was because I was concerned about grease (I was using 75/25 ground beef).  However, there was no reason to be concerned.  Even though each dish was holding 30 meatballs, there was hardly any grease at all.  I would've been fine using a cookie sheet.
Like I said before, I used bread crumbs, and I made a double batch.  I was using plain bread crumbs because the recipe not only didn't call for Italian bread crumbs, but I was also out of them at the time.  In the future, I will probably use Italian bread crumbs just to get an extra bump of flavor.
Not only was I using plain bread crumbs, though, but I ran out of them; instead of having the two cups I needed, I only had 1 1/4 cups.  What did I do?  I didn't panic.  I first considered toasting off some bread in the oven and grating it into bread crumbs (because my food processor was lost in our last move), but I quickly brushed that off and opened a sleeve of saltine crackers and crumbled up a good bit of them in place of the remaining 3/4 cup of bread crumbs.
Let me also say, do not over mix your meatball mixture.  Mix it until it just comes together.  I know you're going to want to mix it thoroughly, to make sure everything is evenly distributed, but have faith in your mixture that it's mixed enough.  If you over mix your meatballs, they're going to be tough meatballs.
Finally, I used a small (ish) ice cream scoop and a spoon to round off my meatballs and get them into the pan.  It allowed for cleaner hands and more uniformity in my meatballs.

Overall Meal


So what goes with meatballs?  Duh~~.  Spaghetti.  So we had spaghetti and meatballs, and it was delicious.  Now I didn't serve any sides with it, but some good sides would be garlic bread (or cheesy garlic bread...yum~), and a side salad.  Or, even better?  A Caesar salad, for one thoroughly Italian meal.
And, as you all can tell, I found my old digital camera.  From now on, my posts will include pictures.  Enjoy!

UPDATED 02/13/14:

  • Added links under recipe titles to credited source

Questions?  Leave a comment!

Sunday, January 19, 2014

Pulled Pork...Yummers!

BBQ Pulled Pork

Personal
Yield: 3-5 lbs
Time:  10-11 hours

3-5 lb pork roast
Salt & pepper to taste
1 tbsp garlic powder
1 1/2 tsp paprika
1/2 tsp chili powder
Campbell's Slow Cooker Sauces-Apple Bourbon BBQ
1/3 18 oz bottle Sweet Baby Ray's Award Winning Barbecue Sauce
1/4 cup apple cider vinegar
2 tbsp worcestershire sauce
1/4 cup honey
1/4 cup light brown sugar
1/2 cup ketchup
2 oz tomato paste
1/2 cup unsweetened apple sauce
3 tbsp coffee

Combine all ingredients in crock pot and cook on low 8 hours.  Remove lid and shred pork; it will be fork-tender.  Leave lid off, turn crock pot on high and allow sauce to reduce/thicken 2-3 hours, until desired consistency.

Potato Pancakes

Anne Burrell
Yield:  4-5 servings
Time:  Varies

5 russet potatoes, grated
about 1 tbsp apple cider vinegar
salt
3 russet potatoes, boiled with smashed garlic clove & mashed
2 eggs
salt & pepper to taste
vegetable oil, for frrying

Drizzle vinegar over grated potatoes and sprinkle with salt, in a strainer.  Weigh down the grated potatoes, preferably with a plate and heavy can, for 30 minutes.  During this time, boil the other 3 potatoes and mash.  Combine mashed and grated potatoes.  Add in eggs.  Season to taste.
Heat oil in frying pan on just over medium heat.  Form potato mixture into thin patties and fry until golden brown on each side.  To keep warm, turn oven on 225-250° and place cooked potato pancakes on cooling rack with a cookie sheet under it.

More Info 

BBQ Pulled Pork

I know.  Using the Slow Cooker Sauce and the BBQ Sauce is cheating.  But let me explain the beginnings of this recipe.  We were using the Slow Cooker Sauce by itself on our pork roasts, but then my family started complaining that the flavor was weak.  So the next month, when I bought it and was about to cook with it, I started to look around my kitchen for ways to bump up the flavor.  And thus, this recipe was created.
Obviously, because of the cooking time, this needs to be started in the morning.  Which is pretty much why the coffee got added to this recipe.  It was there, because my step-father was drinking it.
We eat our pulled pork on hamburger buns; I, personally, like my pulled pork on a hamburger bun with a thin layer of mayonnaise on both sides, a slice of cheese, and thinly sliced onion.  Like the title says...yummers!

Potato Pancakes

Okay, first of all, I highly recommend following the original recipe.  Head over to Food Network's website and search for potato pancakes, and use Anne Burrell's recipe.  My recipe is different because I didn't get a chance to get out and buy Yukon Gold potatoes.  Which probably would be much better for this recipe.
Secondly, I made my potato mixture during the first couple of hours of the BBQ and refrigerated it.  So this is a recipe you can do ahead of time and cook at the last minute.
Thirdly, when I say to form these into thin patties, I mean really thin.  Otherwise the grated potatoes don't cook correctly and the texture is very odd.
Also, I know this recipe is called potato pancakes, which will make most think German, and that the sides for this should be sour cream or apple sauce.  However, my brother said that these reminded him more of hash browns, and both he and I ate ours with ketchup instead of the traditional condiments for this dish.
If you follow the original recipe, you most likely will get a far different result than you will get if you follow my recipe.  For one thing, yukon golds are naturally more creamy than russets, so they'll cook more easily, too.
Also, I had to go out and buy a grater for this recipe.  Because my old one has gone missing somehow.  But that's beside the point.  I got a cheap one at Wal-Mart.  $3.24 (before tax).  I think it might've been the Mainstays brand, but I'm unsure; the label was the Mainstays colors (blue, black, and white) and it was under a bunch of Mainstays brand items, but the label didn't actually say Mainstays.

Overall Meal

So if you put the roast on at 7 in the morning, dinner will be ready by 5 or 6.  When the sauce for the pulled pork is getting close to where you want it, start cooking the potato pancakes.  Serve with a vegetable side or a salad, if you wish (I didn't, but a salad probably would've been nice with this meal).  Set out pickles (I recommend sweet or bread and butter pickles, to balance with the pork a little bit), mayonnaise, ketchup, cheese, sliced onion, and hamburger buns.  These are just the condiments I recommend, you can certainly add/take away to/from this.  Anyway, I hope you enjoy this as much as my family did.

UPDATED 02/13/14:

  • Added links under recipe titles to credited source

Questions?  Leave a comment!

Tuesday, January 14, 2014

Pretty Southern

"BBQ" Spice Blend

Personal
Yield:  Varies
Time:  5 minutes

Minced garlic (4 cloves for small batch)
Salt & pepper (to taste)
Garlic powder (Medium)
Paprika (Medium-heavy)
Chili powder (Heavy)
Ginger (Light)
Nutmeg (Light)
Cardamom (Very light)
Cinnamon (Very light)
Light brown sugar (Light-medium)

Blend in bowl or plastic bag and store until ready to use.

Braised Beef Brisket

Claire Robinson
Yield:  "6" servings
Time:  12 hours, 4 hours

1 (6 pound) beef brisket
1/2 cup "BBQ" spice blend
1 cup cold beef broth

Braise Mixture
3 cups hot beef broth
1 tbsp coffee grounds
1/4 cup light brown sugar
1 tbsp worcestershire sauce
Pepper to taste
1/4 cup apple cider vinegar

Rub brisket with spice blend & marinate in refrigerator at least 12 hours.
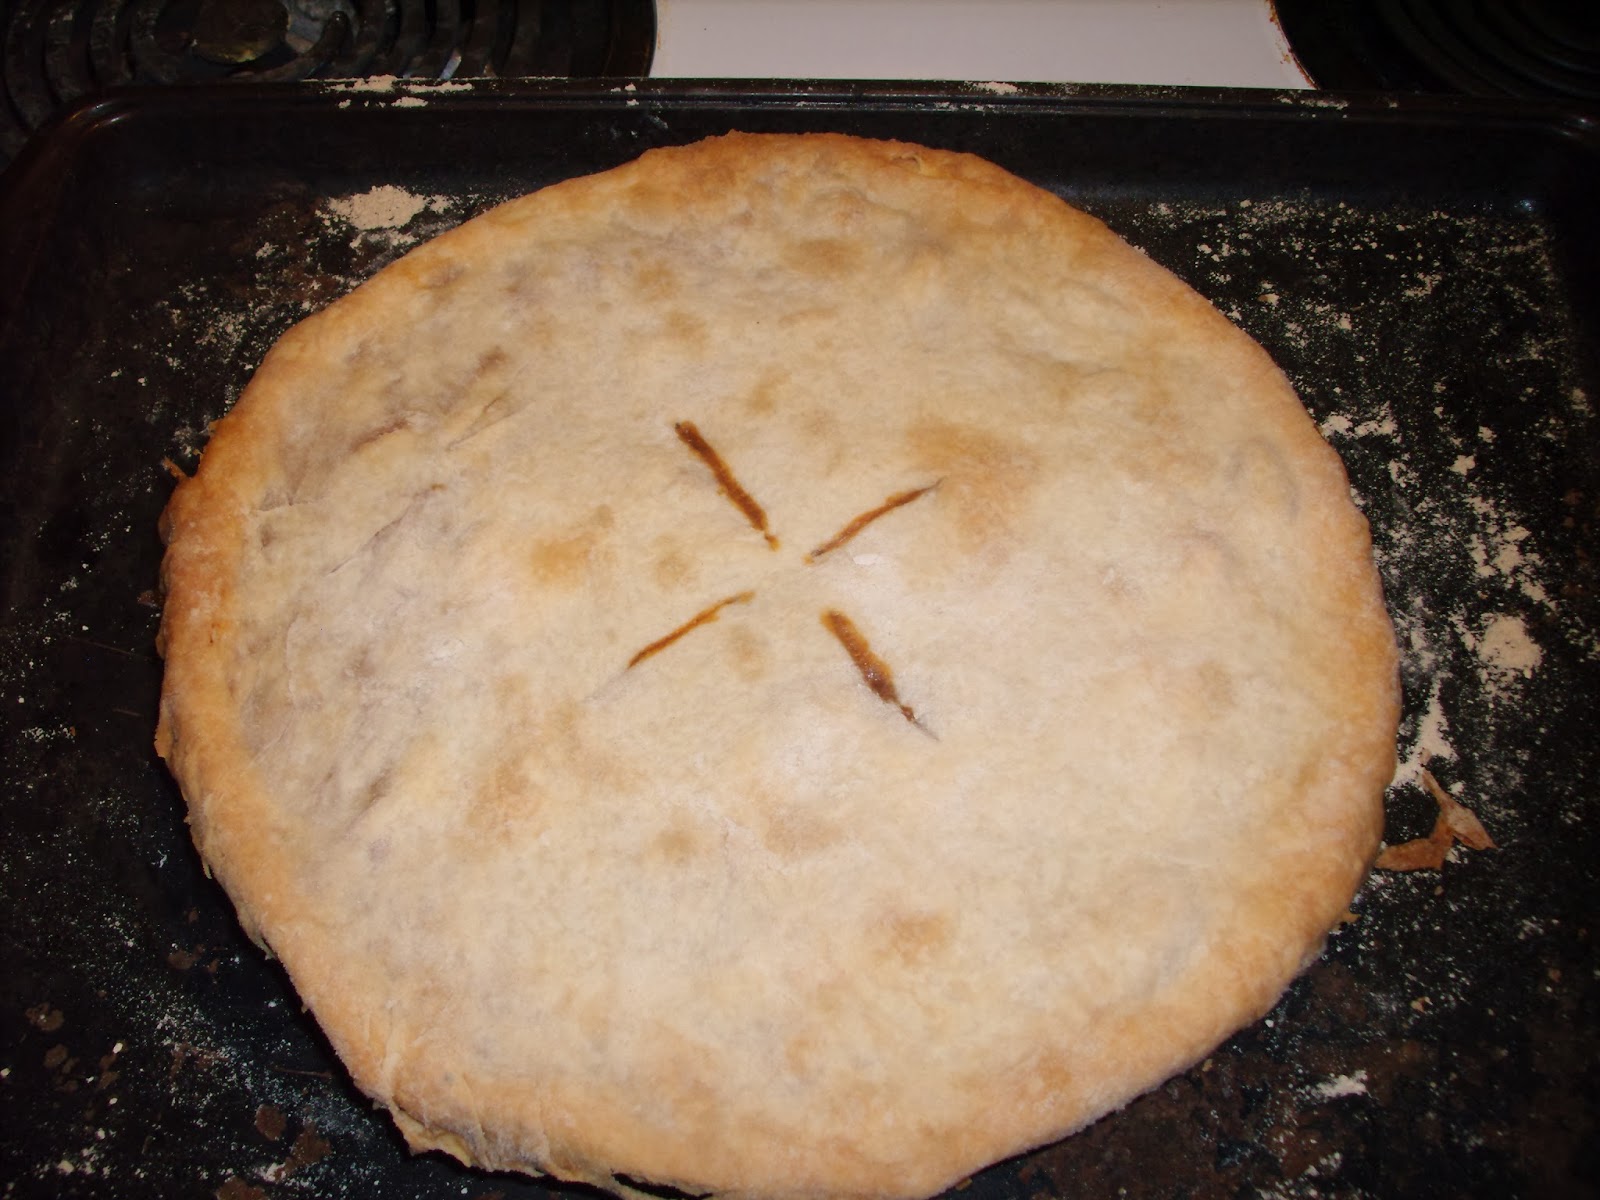
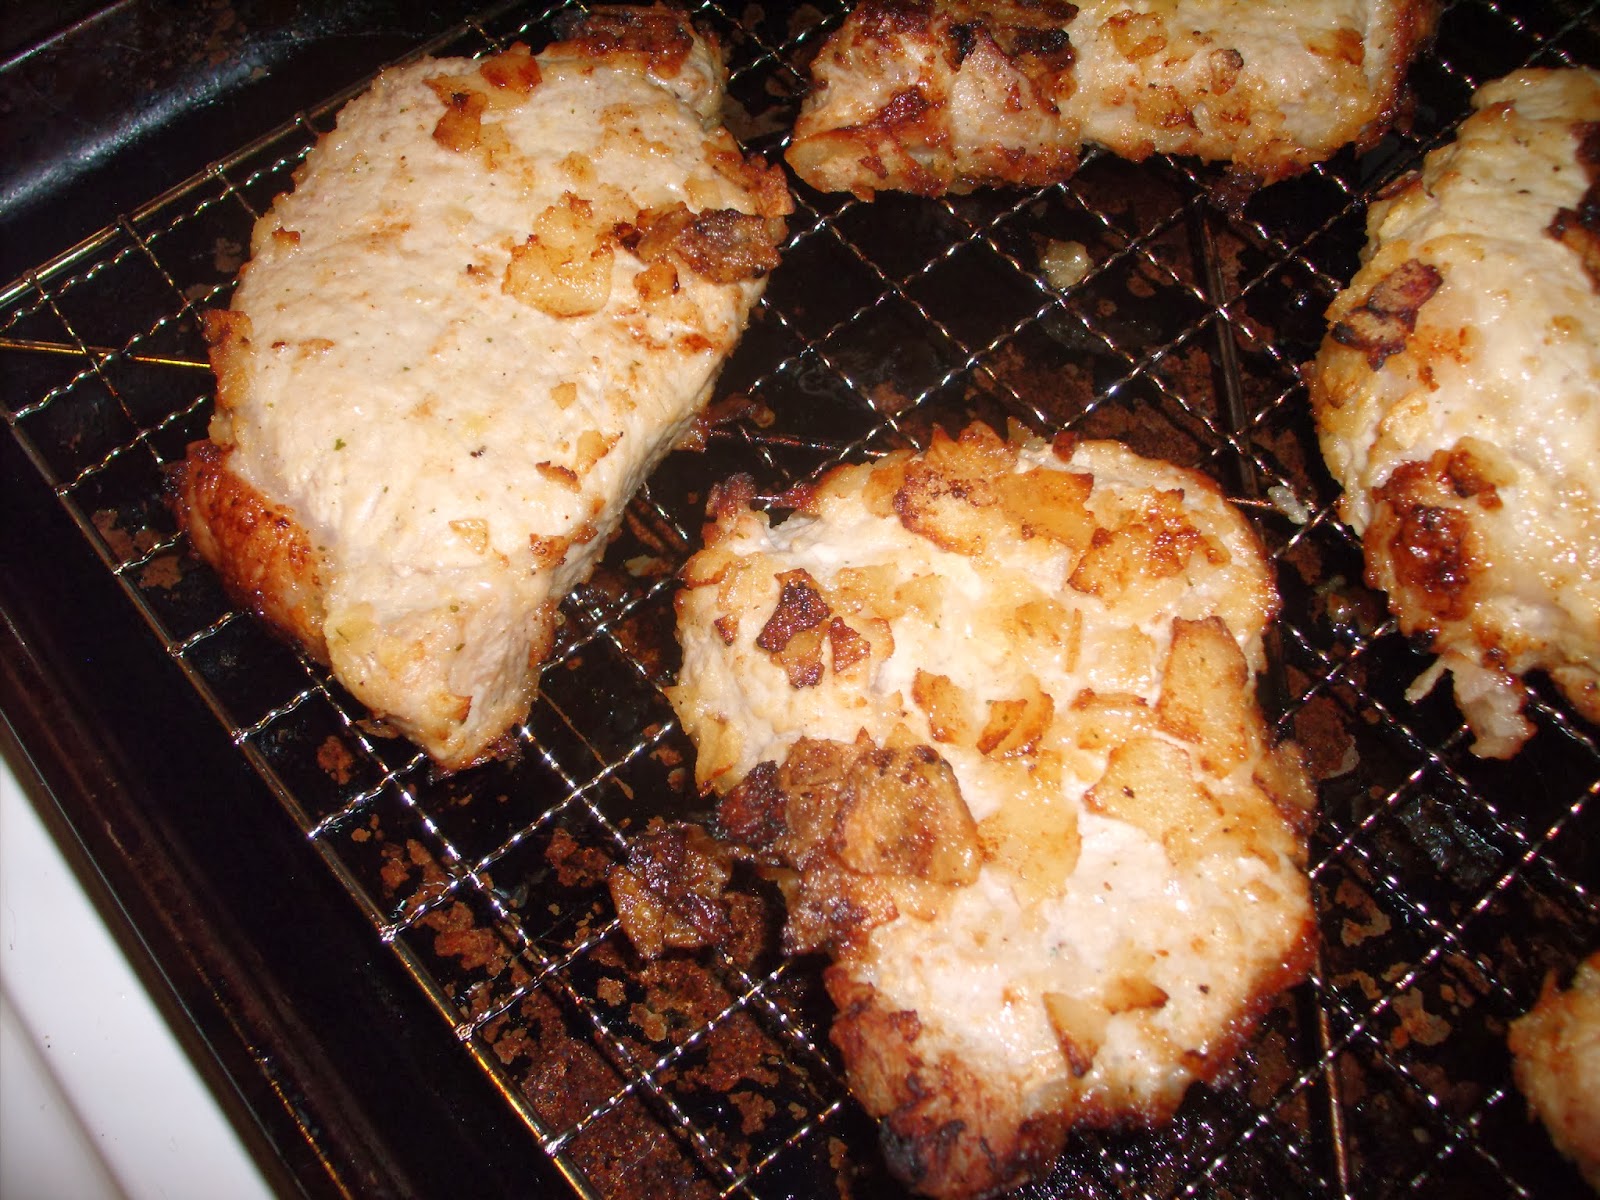
Heat oven to 350°.  Put brisket in roasting pan, fatty side up; add cold beef broth and roast uncovered, 1 hour.  Add braise mixture; cover & braise 3 hours or until internal temperature of 185°.  Let rest and serve with rolls (follows).

Easy Rolls

Paula Deen
Yield:  24 rolls
Time:  22-34 minutes

4 cups flour
2 tsps salt
6 tsps baking powder
2 cups milk
4 tbsps sugar
8 tbsps mayonnaise

Butter Mixture
1/2 stick butter, melted
Salt, pepper, & rosemary, to taste

Heat oven to 350°.  Butter 2 12-cup muffin tins.
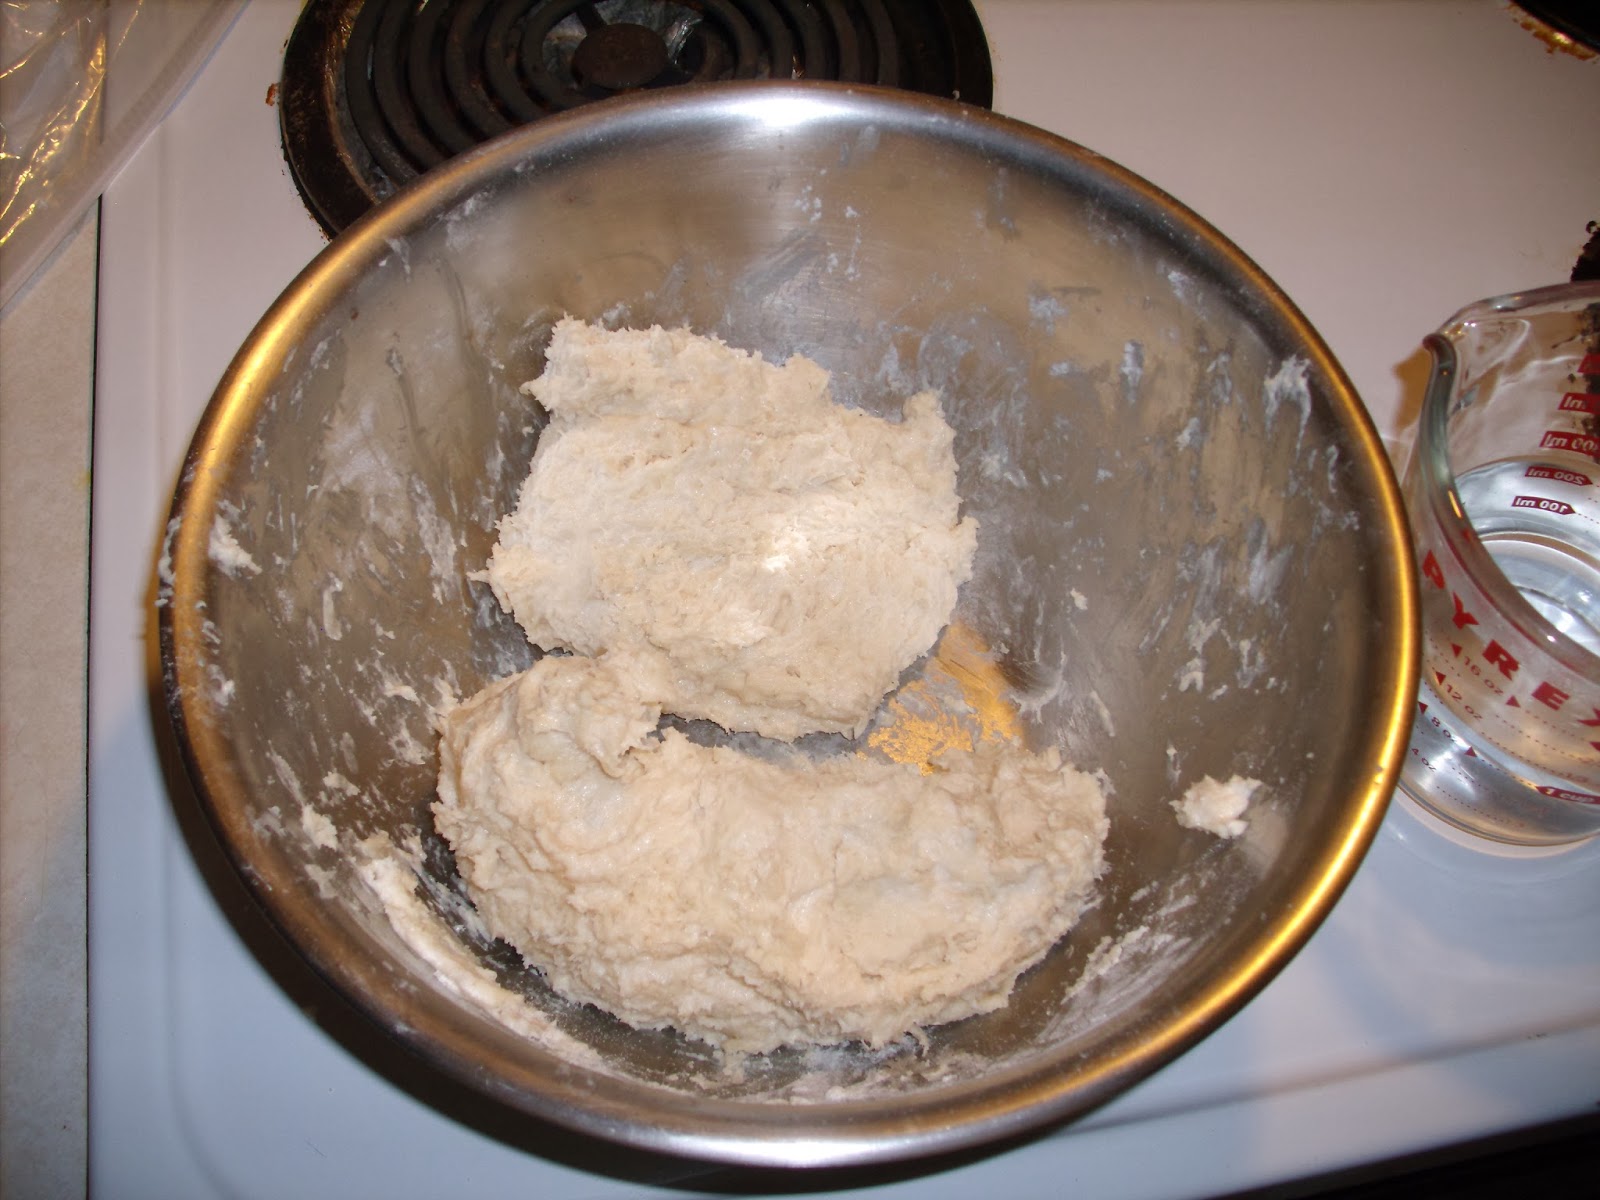
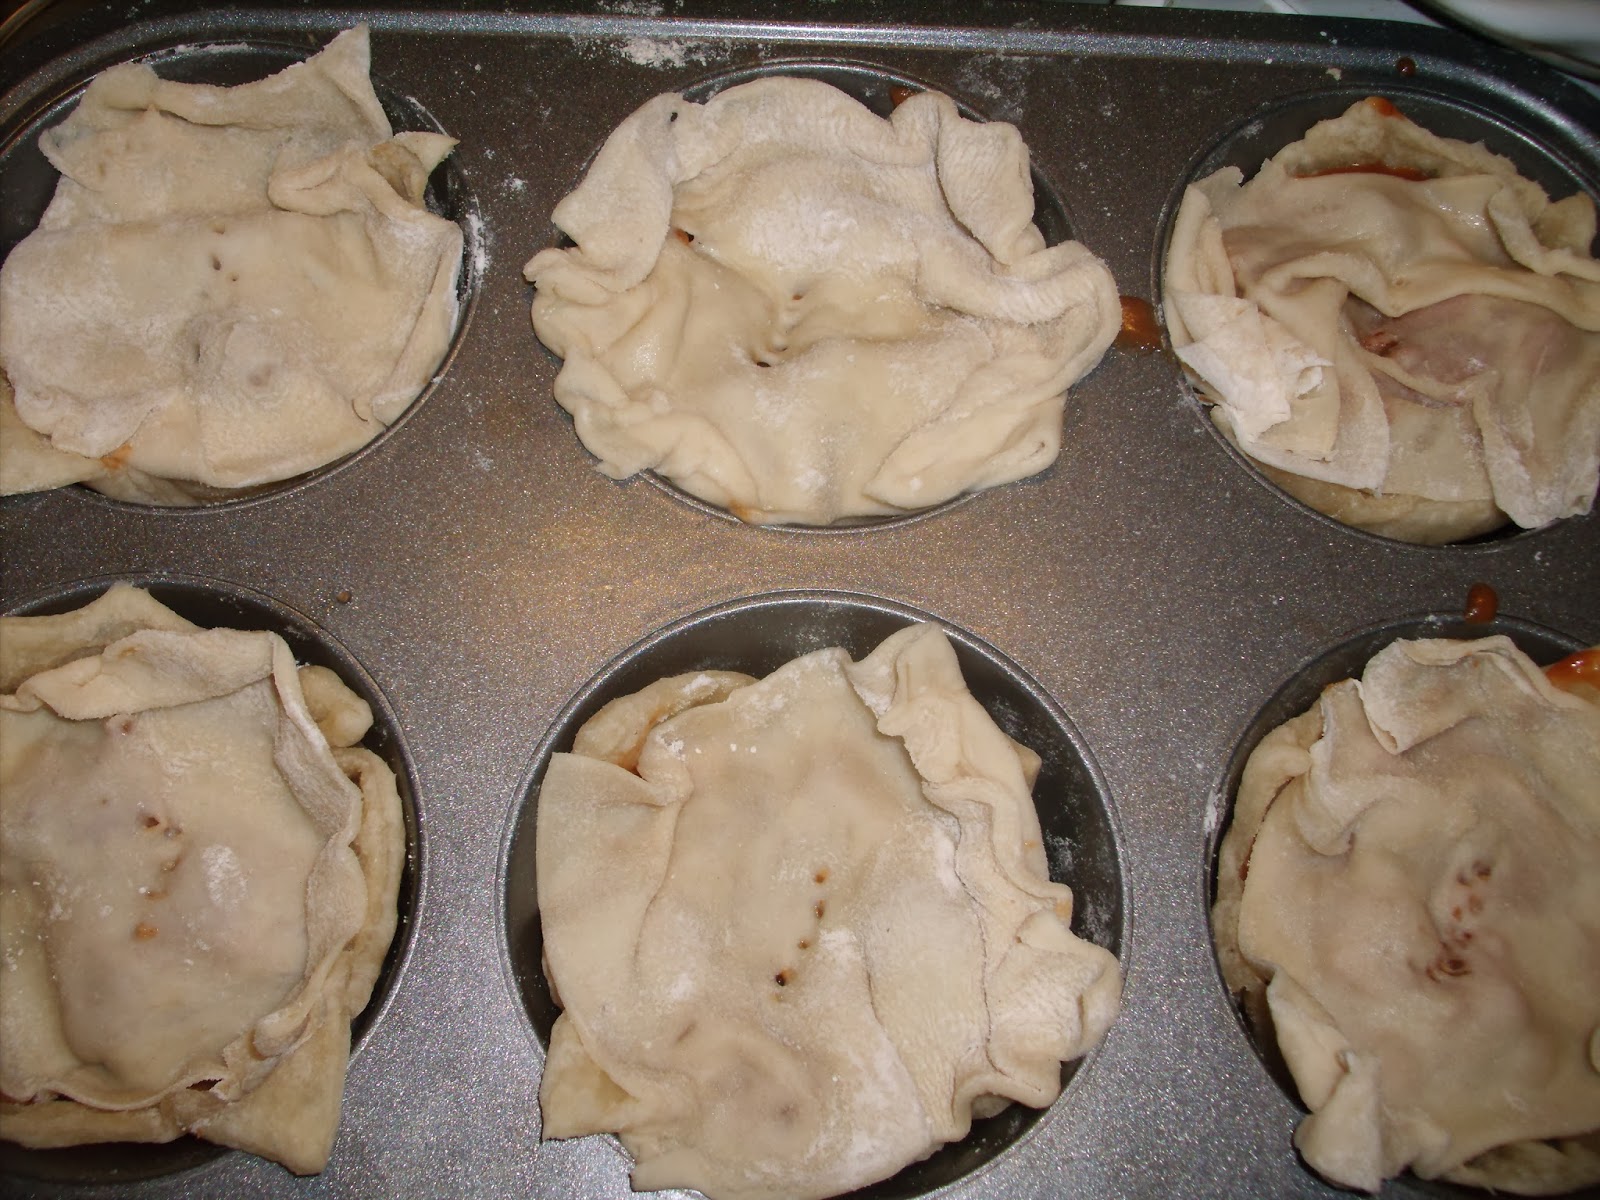
Mix flour, salt, baking powder, and milk.  Add sugar and mayonnaise, stirring to combine.  Spoon batter into tins, filling about 1/2-3/4 of the way full.  Brush with butter mixture & bake 15 minutes.  If rolls are not brown/golden on top, give an additional 12 minutes.


Apple Cinnamon Bread

Facebook:  Links to Allrecipes
Yield:  1 loaf
Time:  50-62 minutes

Apple Mixture
1 Granny Smith apple, peeled & chopped
1 tsp cinnamon
1/3 cup light brown sugar
Pinch salt

Butter Mixture
1 stick butter, softened
2/3 cup white sugar
2 eggs
1 1/2 tsps vanilla extract

Flour Mixture
1 1/2 cups flour
1 3/4 tsps baking powder
Pinch salt

1/2 cup milk

Heat oven to 350°.  Butter & flour loaf pan.
Mix the butter mixture into the flour mixture.  Add milk and stir until smooth.  Add half the batter to the loaf pan and smooth out.  Add half apple mixture and spread as evenly as possible.  Repeat layers.  Bake 40-52 minutes.

More Info

"BBQ" Spice Blend

I know that the comments in the parentheses next to the ingredients is probably confusing, but I didn't measure when I made my spice blend.  I just threw the ingredients into a bowl and mixed them up, then put them on the brisket and rubbed it down.  Basically, do this to your own taste.  I just put the comments there to let you know what there was more of in the recipe as compared to the other ingredients.  I will say this, though; if you use the cinnamon, as I did, make sure to just use a tiny sprinkle of it.  Cinnamon is a pretty strong flavor, and even a tiny sprinkle will still give it a decent presence.

Braised Beef Brisket

Okay, lets start with this; I used the flat cut of the brisket for this recipe.  Also, my flat cut was probably more like 9 lbs or so (the 1/2 cup spice blend was still plenty).  The original recipe?  It said to trim the fat on the brisket....  I, uhm...forgot to do that.  Didn't make a huge difference, except that there was a large amount of rendered fat in the pan when it was done.  Also, the original recipe said to remove the brisket to let it rest and put the pan on the stove and turn it on to reduce/thicken the drippings down into a sauce, skimming off the fat.  The idea of the original recipe was to use the rolls and sauce and brisket to make sandwiches.  I forgot about reducing the sauce, though.  Basically, we had the brisket as a roast with dinner rolls, and it was good.
Also, the braise mixture?  It does need to be warm.  It's not a good idea to put cold liquid on hot meat, especially when the fat side is up.  It'll basically make the meat seize back up, and that isn't what you want at all.
The original recipe (for the braise mixture) called for dark brown sugar, finely ground coffee, and did not include worcestershire sauce.  I wasn't about to go out and buy dark brown sugar, when I had light brown sugar in the cabinet.  I also used the regular ground coffee we had (not a big deal, if you ask me).  And the worcestershire sauce...I don't know why I added it, but the brisket was good, so...I guess it was a good idea.
The original recipe didn't call for beef broth, by the way.  It said water.  But I wanted more flavor than that.  So I used "beef broth."  ...Meaning I put four cups of water on the stove, brought it to a simmer with a bay leaf in it, and added five packets of beef ramen seasoning, then separated out the one cup from the three cups and refrigerated it to make it cold.
Actually, I refrigerated the braise mixture, too, because I made it a day in advance.  When it was time to put it on the brisket, I popped open a corner of the container lid and put it in the microwave for about 3 minutes, then poured it over the brisket and covered with aluminum foil.
Oh, and I took the brisket out of the refrigerator two hours before I put it in the oven and let it come to room temperature.  Because, as I've said before, I prefer my meats at room temperature when I cook them.
As for the cook time, after adding the braise mixture, you're supposed to cook an additional 3 hours.  And you can do that, sure...but I checked my brisket at 2 hours and 15 minutes, and it was done.  Which was good, because my step brother was pretty darn hungry (he'd just gotten off work).

Easy Rolls

This is doubled from the original recipe.  Also, the original recipe called for self rising flour.  I just looked up the substitution for self rising flour on the internet (because I only had all purpose flour, and I wasn't about to go out and buy extra ingredients).  Now, you can add the salt and baking powder to the flour, but what I did was put the salt and baking powder into the cup measure, then poured the flour (carefully) into the cup measure until it was full and added it to the bowl.  Then I measured out the rest of the flour normally.
You could probably use a stand mixer with a dough hook to mix this together, but I didn't.  I did it by hand.  And I know the recipe says to stir in the sugar and mayonnaise, but really, you kinda need to use your stirring utensil to sort of cut it in, because the flour and milk become a really thick mixture.
Also, I don't have a pastry brush, so I just used a spoon to sort of rub the melted butter mixture on top of the roll batter.
Now, the original recipe says that the rolls take 15 minutes to bake.  And maybe they do if you make the batter right before you bake it.  But I made it a day ahead and had it in the refrigerator until right before I baked it, so that's probably why mine took 27 minutes to bake.  Then again, the reviews on Food Network's website for this recipe indicated that these rolls were taking about half an hour for most people when they baked them.  So...after 15 minutes, kind of keep an eye on them.  Honestly, when I saw they weren't done, I guessed 12 minutes and put them back on, and they came out perfect and beautiful.
And the butter mixture is something I threw in.  Mostly because the reviews on Food Network's website complained that the recipe lacked flavor.  I just melted the butter in a small sauce pan over the stove eye that my oven vents through, and threw in salt, pepper, and rosemary, letting it kind of marry together while I was spooning the batter into the muffin tins.

Apple Cinnamon Bread

The original recipe included no salt whatsoever.  I added salt to the flour mixture and the apple mixture because I'm a firm believer that just about everything needs at least a pinch of salt.  Especially sweet things.  Salt helps bring out the sweetness and balance the recipe, if you ask me.  Also, the original recipe didn't specify what kind of apple to use, so I did make this recipe twice; once with a Granny Smith, and once with a Red Delicious.  My family preferred the Granny Smith apple, because the tartness marries well with the brown sugar.  Plus, once it's cooked and soft, it's just amazing.
The butter mixture needs to be creamed together.  So cream together the butter and sugar, add the eggs, then the vanilla and bam.  Simple.  You can probably do this part in a stand mixer with a whisk or paddle attachment.  I didn't, though.  I used a hand mixer (less dishes to wash...smaller bowl, and two little beaters you can stick in the utensil holder in the dishwasher).
The flour mixture and the butter mixture, after mixed together, will kind of look like cookie dough.  After you add the milk, though, it's going to look like a thick pudding.  This is good!
The original recipe said that the longest the loaf was supposed to take was 40 minutes.  Both times I prepared it, it took 52 minutes (no, this time I didn't randomly add twelve minutes.  I added seven minutes, then five...the first time.  The second time, I added 12 randomly).
One final note, the loaf pan I used was 9x5...I actually had to buy a new one for this, and I got a good one for just under 4$.  Wal-Mart's Mainstays brand, to be specific.  It was nonstick and of good quality and weight.
This loaf is great warm as a dessert, which is what I did with it for this meal.  Serve it with some butter (or butter spread), and it's amazing.  Store in the fridge (if you want), in a plastic bag.

Overall Meal

Okay, so the way we ate this (as I stated before), was basically like a roast (sliced up), with dinner rolls, a veggie on the side (canned peas in this case...I prefer frozen, but my step-brother and step-father like canned...), and we had the apple cinnamon bread for dessert.  I cooked the brisket, then let it rest, covered so it would keep warm, while I baked the rolls.  I cooked the veggie side while the rolls were in the oven.  When the rolls were done, I served up dinner and got the loaf into the oven (I prepared the first batch while the roast was cooking) to bake.  The great thing about these recipes is that they're all at the same temperature in the oven, so you don't have to worry about the oven heating to a different temperature.  You just keep it on the whole time.  Also, these recipes can be made entirely a day in advance and kept in the fridge until you're ready to throw them in!
I know there's a lot of notes on these recipes, but really, they are very simple, and the clean up is pretty easy, too.

UPDATED 02/07/14: 

  • Added picture for Easy Rolls 

UPDATED 02/13/14:

  • Added links under recipe titles to credited source

Questions?  Leave a comment!

Monday, January 13, 2014

Fiesta Night!

Enchilada Sauce


Yield:  2 1/2 cups
Time:  20 minutes

3 tbsp vegetable oil
1 tbsp flour
1/4 cup chili powder

Chicken Stock Mixture
2 cups chicken stock
10 ounces tomato paste
1 tsp oregano
1 tsp cumin
Salt & pepper to taste

In medium sauce pan, heat oil over medium heat.  Add flour & stir with a wooden spoon, 1 minute.  Add chili powder & stir 30 seconds.  Add chicken stock mixture.  Stir & heat to boiling.  Reduce heat to simmer (recommend covering) for 15 minutes.  Taste & adjust seasoning as needed.


Mexican Chicken


Yield:  "8" servings
Time: 35 minutes

2 lbs chicken breasts, cut into cubes
Salt & pepper to taste
2 tsps taco seasoning
2 tbsps butter
1 cup enchilada sauce
1 cup shredded cheddar cheese
Chopped green onions

Preheat oven to 350°.  Salt & pepper chicken; sprinkle with taco seasoning and toss to coat.  Melt butter in pan over medium-high heat & cook chicken.
Toss chicken with enchilada sauce & transfer to baking dish.  Top with cheese & bake 20 minutes.

Serve atop taco rice (follows) & garnish with green onions.


Taco Rice


Yield:  6 cups
Time:  35 minutes

4 cups chicken stock
2 tbsp butter
1 packet taco seasoning
2 cups rice

Bring chicken stock and butter to rolling boil; add taco seasoning and stir.  Stir in rice.  Reduce heat to simmer, cover and cook 25 minutes.  Remove from heat & let stand 2-5 minutes.  Fluff & serve.


More Info

Enchilada Sauce

This recipe is pretty true to the original.  I just simplified it a tiny bit by separating the chicken stock mixture from the main body of the recipe.  Also, I made this a few hours before I made the Mexican Chicken, and stored it in a container in the fridge (I will probably wind up freezing it in the near future so I can ensure it doesn't go to waste).

Mexican Chicken

This recipe is doubled from the original recipe.  Why?  Because, while it says 8 servings as a yield, my family is full of big eaters, and basically, 2 servings equals 1 serving for us.
Also, when the chicken was 1/2-3/4 of the way defrosted, I went ahead and cubed it up and coated it with the seasoning, then left it in a container on the counter.  I know, it's not really considered sanitary to do that, but I like to have my meats at room temperature when I cook them.  I'm kind of nutty like that.
In addition, the butter was not included in the original recipe.  The original recipe said to grill or saute the chicken.  Yeah, I went for cooking it in butter.
As for the cheddar cheese, you can use sharp, mild, low fat...whatever.  Personally, I used finely shredded sharp because it was in the fridge, and it was open.
And for the green onions, 3 should be enough unless you use an ungodly amount to garnish the plates with.  ...Well, maybe 4.  I guess it depends on how many servings you actually intend to get out of this recipe.

Taco Rice

Not much to say about this.  Just that I used the rest of the taco seasoning left over from the Mexican Chicken recipe, instead of using a whole packet.  Not a big deal.  Also, you can use a regular long grain rice, or jasmine rice.  I've made this with both, comes out pretty much the same either way.
Also, if you don't have chicken stock, not a big deal.  Use water.  Or, if you have some chicken bouillon around, toss that into the same amount of water after it starts boiling (It makes it easier to dissolve it once the water is boiling).  Or, if you're like me and have ramen seasoning packets around all the time, use that!  Or, even better, make your own chicken stock (I did this for the second time today.  It's something that I'm experimenting with/perfecting, but once I feel I have a good recipe for chicken stock, I'll make sure to post it).
Oh, and it's important to fluff/stir the rice after it has set for a few minutes.  Otherwise, you might get a big bite of taco seasoning and basically nuke your tastebuds.  I've done it.  Not real pleasant.  And yes, the taco seasoning does dissolve into the water, but while the rice is cooking, the seasoning kinda of builds up on top of the rice, especially near the edges of the pot.  So just give it a quick fluff/stir.
And I know 6 cups of rice (after it's all cooked) makes it sound like you need a huge pot, but a simple medium sized pot will work just fine for this, so don't freak out about it, okay?

Overall Meal

Mexican Chicken and Taco Rice


So yeah, put down a bed of Taco Rice, top with Mexican Chicken, and garnish with green onion.  This was enough for a meal for my family, but if you feel like you're missing something, throw some chopped lettuce on top of the rice, and then put the chicken on top of that.  Top with salsa or sour cream (or both) and then sprinkle on the green onion.  Or serve refried beans as a side.  Or put the beans under the rice, and on top of tortilla chips.  There's a lot you can do with these three recipes to make a super meal out of them.  I hope you enjoy!

 UPDATED 02/07/14:

  • Added 2 pictures for Mexican Chicken
  • Added picture for Taco Rice
  • Added picture for Overall Meal

UPDATED 02/13/14: 

  • Added links under recipe titles to credited source

Questions?  Leave a comment!